What to Do After Roof Damage From a Storm
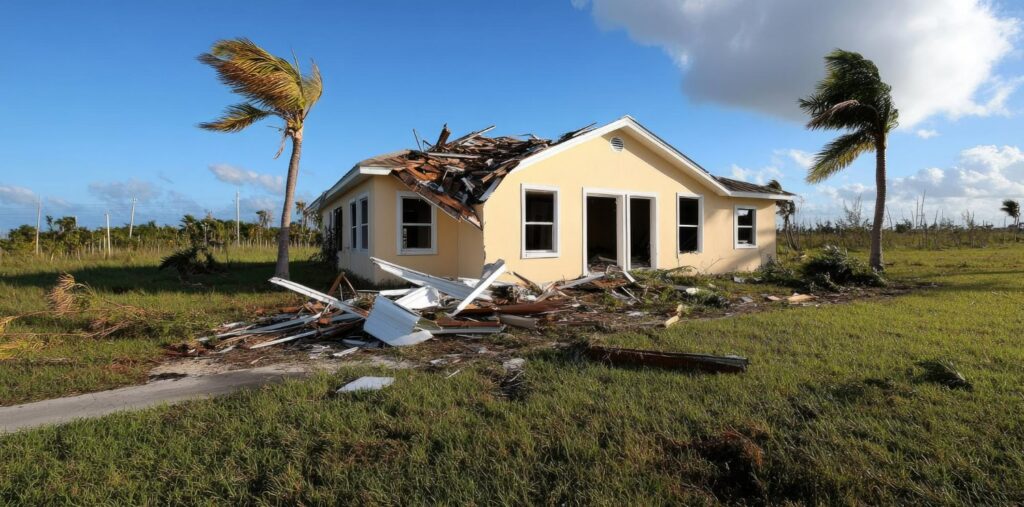
A severe storm in Orlando is a stressful event. The wind, rain, and flying debris create a chaotic situation. When the storm passes, you are left to check on your property. Your roof is your home’s primary shield; it takes the brunt of the weather’s force. Any damage to this shield can lead to significant problems, starting from the moment the storm subsides. Identifying and addressing roof damage is not just about repairs; it is about protecting your home from further harm and securing your financial recovery. The steps you take immediately following the storm are critical. They will heavily influence the safety of your family and the outcome of your insurance claim. This process requires a methodical approach. You must move from ensuring safety to mitigating further loss, documenting the damage, and navigating the complex claims process.
Navigating the aftermath is daunting. Homeowners often feel overwhelmed, unsure where to begin. A damaged roof is a ticking clock. Every drop of rain that follows the initial storm can infiltrate your home, damaging insulation, drywall, and structural supports. This secondary damage can quickly become more expensive and destructive than the initial roof problem. Understanding your responsibilities as a policyholder is essential. Your insurance company expects you to act. Taking the right steps protects your property. It also builds the foundation for a full and fair insurance settlement. This process is a marathon, not a sprint. Rushing or skipping steps can lead to costly mistakes.
Prioritize Your Immediate Safety
Before you even think about the roof, you must confirm your home is safe. Storms leave behind numerous hidden dangers. Never assume the area is secure just because the wind has stopped. Downed power lines are a primary threat. If you see any lines on or near your property, do not go near them. Assume every downed line is live. Contact your utility company immediately. If water has entered your home, be extremely cautious around electronics and outlets. Go to your circuit breaker box. If you can safely access it without standing in water, shut off the main power and the power to any affected areas. Water and electricity are a lethal combination.
Assess the structural integrity of your home from a safe distance. If the storm was severe, the roof damage could be part of a larger structural problem. Look for sagging rooflines, cracked exterior walls, or shifted foundations. If you hear any creaking, groaning, or popping sounds from inside the house, evacuate immediately. These noises can signal that a structural collapse is imminent. Do not attempt to go into an attic or onto a roof that appears unstable. Your personal safety, and that of your family, is the only priority that matters in these first few anxiouis moments. Property can be repaired; people cannot.
Perform an Initial Damage Assessment
Once you have confirmed it is safe, you can begin your initial assessment. This must be done from the ground. Do not climb onto a wet, unstable, or debris covered roof. The risk of falling is too high. Use binoculars or the zoom feature on your phone’s camera. Walk the entire perimeter of your property. Look for obvious signs of damage. This includes missing, cracked, or torn shingles. Check your gutters and downspouts; significant granule loss from shingles will often collect there, looking like dark sand. Look for any debris, like tree limbs, that has impacted the roof. Note any dents or cracks on vents, flashing, or skylights.
The exterior view only tells part of the story. The most critical damage is often found inside. Carefully enter your attic, using a powerful flashlight. This is the best place to find evidence of leaks. Look for dark stains on the underside of the an roof decking. Check for any wet insulation; it will be matted down and darker than the surrounding dry insulation. Look for any visible light shining through the roof. Even a small pinhole of light signifies a direct path for water.
Do you or someone you know have wind damage? Click here to get in touch with our adjuster.
After checking the attic, walk through every room in your home. Examine the ceilings and exterior walls. You are looking for new water stains, which may appear as discolored yellow or brown circles. Check for peeling paint, bubbling drywall, or areas where the ceiling texture is sagging. If you find active drips, place buckets underneath them immediately. This interior inspection is crucial. It provides clear evidence that the roof system has failed and water is infiltrating the building envelope. This evidence directly links the storm to your interior damage, which is a vital component of your insurance claim.
Mitigate Further Damage Immediately
Your insurance policy contains a critical clause often called the “Duty to Mitigate.” This is a legal requirement. It states that you, the policyholder, must take reasonable steps to prevent further damage to your property after a loss. If your roof is leaking and you do nothing, the insurance company could deny claims for the subsequent mold, rotted wood, and ruined drywall. They will argue that your negligence caused that secondary damage, not the storm. Immediate mitigation is non negotiable.
The most common emergency mitigation for a damaged roof is tarping. If you have significant holes or large sections of missing shingles, the exposed roof deck must be covered. This prevents thousands of gallons of water from pouring into your home during the next rain shower. You can hire an emergency roofing service to place a tarp, or you can do it yourself if it is safe. This is a temporary fix, but it is an essential one. Keep the receipts for any tarps, wood, or hardware you purchase. These items are typically reimbursable as part of your claim.
Mitigation also applies to the interior of your home. If water has already entered, you must remove it. Use towels, mops, or a wet dry vacuum to get rid of any standing water. Once the standing water is gone, the drying process begins. Open windows if the humidity outside is low. Run fans and dehumidifiers at full capacity. Move wet furniture and area rugs to a dry location. The goal is to dry the structure as quickly as possible. This is your best defense against mold. Mold can begin to grow in as little as 24 to 48 hours in damp, warm Florida conditions. Preventing mold is far easier and cheaper than remediating it later.
If the water intrusion is severe, you may need to call a professional water mitigation company. These companies have specialized equipment like industrial air movers and desiccant dehumidifiers. They can properly dry out wall cavities and structural materials. This is often a covered expense under your policy. Again, keep every invoice and document every action taken by the mitigation crew. Your insurer will want proof that you fulfilled your duty to protect the property.
Document Everything Meticulously
From the moment you discover the damage, you must become a meticulous record keeper. The burden of proof in an insurance claim rests entirely on you, the policyholder. You must prove the extent of your loss. Your insurance company will not do this work for you. The adjuster they send works for them, not you. Excellent documentation is your most powerful tool in the negotiation process. Without it, you are relying on the insurance company’s assessment, which may not be in your best interest.
Start by taking photographs. Take hundreds of them. You cannot take too many. Use your smartphone to capture every angle of the damage. Take wide angle shots of your entire home from all four sides. This establishes the overall condition and shows the context of the damage. Then, move in closer. Take close up photos of missing shingles, hail impacts, cracked tiles, and debris. Photograph damaged gutters, vents, and flashing. Place a common object, like a ruler or a coin, next to smaller impacts to provide a sense of scale.
Inside your home, photograph every water stain on the ceiling and walls. Take pictures of the wet insulation in the attic. Document the buckets collecting water. Take photos of any personal property that was damaged, such as computers, furniture, or clothing. After taking photos, switch to video. Take a slow walk around the exterior of your property, narrating what you are seeing. Do the same for the interior. This “video tour” of the damage can be incredibly compelling evidence.
Create a dedicated folder or notebook for your claim. Log every single communication you have with your insurance company. Write down the date, time, the name of the person you spoke with, and a summary of the conversation. Keep every receipt for any expense related to the storm. This includes tarps, plywood, cleaning supplies, and even hotel receipts if you are forced to evacuate. This detailed log will become an invaluable timeline. It prevents confusion and holds the insurance company accountable for the information they provide.
Understanding Your Insurance Policy
Your insurance policy is a complex legal contract. It is not light reading. However, you must review it to understand your coverage. This document dictates exactly what is covered, what is excluded, and how you will be paid for your loss. Many homeowners are unpleasantly surprised by their policy details after a disaster. Do not be one of them. Find your declarations page. This page summarizes your coverage limits.
The most important detail to find is your deductible. For storm damage in Florida, you likely have a “Hurricane Deductible” or a “Named Storm Deductible.” This is different from your standard “All Other Perils” deductible. A standard deductible is usually a flat dollar amount, like $1,000 or $2,500. A hurricane deductible is almost always a percentage of your home’s total insured value. For example, a 2% deductible on a home insured for $400,000 is $8,000. This is the amount you must pay out of pocket before the insurance company pays anything.
Want to know why insurance claims get denied? Click here for more information.
You also need to identify your basis of settlement. Your policy will pay for your roof on one of two bases: Replacement Cost Value (RCV) or Actual Cash Value (ACV). This distinction is critical. RCV pays the full cost to replace your roof with new materials of like kind and quality, minus your deductible. ACV pays for the depreciated value of your roof. If your roof is 15 years old, an ACV policy might only pay for 25% of its replacement cost, leaving you to pay the rest. Many policies for older roofs are written as ACV. You must know which one you have.
Finally, look for any exclusions. Some policies have specific exclusions for wind driven rain unless the wind first creates an opening in the building. Other policies may have limitations on older roofs, stating they will only pay for repairs, not a full replacement, even if a replacement is warranted. Knowing this information upfront prepares you for the conversation with your insurer.
Initiating the Insurance Claim
After you have mitigated further damage and documented the loss, it is time to formally initiate the claim. This is also known as providing a “Notice of Loss.” Do this promptly. Most policies require you to report a loss in a timely manner. You can call the 1-800 number for your insurance carrier, or you can use their online portal. Many insurance apps now allow you to start a claim directly from your phone.
When you make the initial call, be direct and stick to the facts. Give your name, address, and policy number. State: “My home sustained roof damage from the storm on [Date].” That is it. Do not speculate on the cause or the total cost. Do not say “I think the damage is minor” or “I think I need a whole new roof.” These are opinions. Stick to the verifiable facts. You have roof damage, and it caused interior leaks.
The insurance company will assign you a claim number. This number is your primary identifier for the entire process; write it down and keep it handy. They will also likely ask you to give a recorded statement. You should be very careful with this step. The purpose of the recorded statement is to lock in your story. Anything you say can be used against you later. Again, stick to the facts. If you do not know the answer to a question, it is acceptable to say “I do not know.” Do not guess.
Next, the insurer will assign an adjuster to your claim. This person may be a “staff adjuster” who works directly for the insurance company. They could also be an “independent adjuster” who is a third party contractor hired by the insurer for that specific claim. It is crucial to remember that in both cases, this adjuster’s job is to represent the insurance company’s interests. Their goal is to evaluate the damage, review your policy, and determine how much the insurer owes you according to their interpretation of the contract. This person is not on your side.
Why You Need Your Own Representation
The insurance claim process is inherently adversarial. The insurance company is a for profit business. Their financial interest is to pay out as little as possible on claims. They have a team of experts, adjusters, and engineers all working to protect their bottom line. The adjuster they send to your home may seem friendly, but they are not your advocate. They are looking for reasons to limit or deny your claim. They may underestimate the scope of work, use outdated pricing, or misinterpret your policy language in their favor.
This is where a Public Adjuster becomes your most valuable asset. A Public Adjuster is a state licensed and bonded insurance professional. Unlike the company’s adjuster, a public adjuster works exclusively for you, the policyholder. We are your advocate. We manage the entire claim process on your behalf, with the sole goal of protecting your interests and maximizing your settlement. We level the playing field. When you hire US CARE Claims, you are hiring an expert who understands the complex policy language, Florida’s specific insurance statutes, and the true cost of construction and repair in Orlando.
Our process is far more thorough than the insurer’s. We conduct our own independent, detailed inspection of your property. We use thermal imaging cameras to find hidden moisture. We measure and photograph every square foot of damage. We create our own professional estimate using the same software the insurance companies use, but we ensure it includes everything you are owed. We account for code upgrades, matching materials, and every line item necessary to return your home to its pre loss condition.
We then compile this extensive evidence package and present it to your insurance company. We handle all the phone calls, all the emails, and all the negotiations. You are no longer responsible for arguing with an adjuster. We fight for you. Studies consistently show that policyholders who hire a public adjuster receive significantly larger settlements than those who handle the claim alone, even after our fee. We take the stress and burden of the claim off your shoulders so you can focus on your family and rebuilding.
Recovering from storm damage to your roof is a marathon. The initial shock gives way to a long and complicated process. Your immediate actions for safety, mitigation, and documentation are the foundation of your recovery. The insurance claim that follows is a business negotiation, one where you are at a distinct disadvantage. You do not have to go through it alone. The insurance company has its experts. You are entitled to yours. US CARE Claims is here to be your advocate, to ensure your rights are protected, and to fight for the full and fair settlement you deserve.